Installing a barn door looks simple on the surface, but most long-term problems trace back to one overlooked step: the header board. I have seen beautifully chosen doors fail because the track was mounted directly into drywall or poorly aligned studs. A header board solves those problems, but only when it is installed correctly.
This guide walks through how to install a header board for a barn door track system, what decisions matter most, and where people often cut corners. If you want your door to slide smoothly for years instead of months, this step deserves your attention.
What A Header Board Actually Does
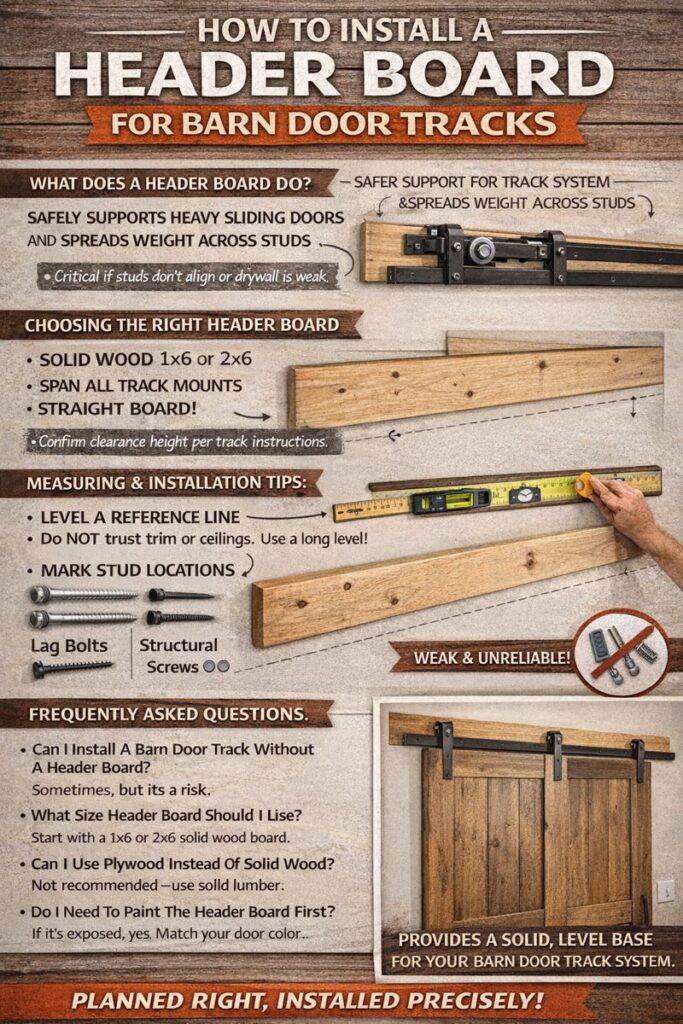
A header board is a horizontal piece of solid lumber mounted above the door opening. The barn door track attaches to this board instead of directly to the wall. This spreads the door’s weight across multiple studs rather than relying on perfect stud placement or drywall anchors.
In real homes, studs rarely align with track mounting holes. The header board eliminates that limitation and adds a safety margin. It also allows cleaner installation since you can level the board independently of the wall.
When A Header Board Is Necessary
In my experience, a header board is required in most installations, not just some. You should plan to use one if any of the following apply:
- Studs do not align with track holes
- The door weighs over 75 pounds
- You are installing a bypass or double-door system
- The wall is drywall over metal studs
- You want maximum long-term stability
Skipping the header board is a gamble. Sometimes it works temporarily. Sometimes it fails dramatically.
Choosing The Right Header Board Material
Wood Type Matters
Use solid lumber, not MDF or plywood. A straight 1×6, 1×8, or 2×6 board works well in most installs. For heavy doors or long spans, a 2×6 offers extra stiffness.
Softwoods like pine are acceptable if the board is straight and well secured. Hardwood adds strength but costs more and weighs more.
Board Height And Length
The board must be long enough to span all studs behind the track. It should also extend slightly beyond the track ends when possible. Height depends on door size and hardware specs, so always check the manufacturer’s clearance requirements.
Measuring And Layout Before You Drill
This is where most mistakes happen. Take your time here.
Start by finding the finished floor height. Measure from the floor to the top of the door opening. Add the required clearance for rollers and track height based on your hardware instructions.
Mark a level reference line across the wall. Do not assume ceilings or trim are level. Use a long level or laser if available. That line represents the top or bottom edge of your header board, depending on preference.
Next, locate studs and mark them clearly. Confirm spacing, not just location. Old homes often vary.
Installing The Header Board Securely
Fastening To Studs
Pre-drill holes through the header board where it crosses studs. Use lag bolts or structural screws long enough to penetrate at least 1½ inches into the stud.
Avoid drywall anchors. They are not designed for dynamic loads like sliding doors.
As you mount the board, check level continuously. Tighten bolts gradually and alternate sides to avoid pulling the board out of alignment.
Trade-Offs Of Exposed Vs. Covered Header Boards
Leaving the board exposed adds a rustic look and simplifies installation. Painting or staining it to match the door often looks intentional.
Covering the board with trim creates a cleaner appearance but adds complexity. Trim must not interfere with roller clearance. This is purely aesthetic, but mistakes here can cause rubbing or noise.
Mounting The Track To The Header Board
Once the header board is installed, mounting the track becomes straightforward. You can place fasteners exactly where needed without worrying about stud alignment.
Pre-drill track holes, then secure the track into the header board using the hardware provided. Confirm level again before final tightening.
This step is forgiving only because the header board was done correctly.
Risks Of Skipping Or Rushing This Step
The most common failure modes I see include:
- Tracks pulling away from drywall
- Doors slowly sagging out of level
- Rollers binding due to uneven mounting
- Loud operation caused by shifting hardware
These issues usually appear weeks or months later, not immediately. That delayed failure is why people underestimate the header board’s importance.
Realistic Expectations After Installation
A properly installed header board should feel solid and unmoving. You should be able to slide the door without seeing any wall flex. If you notice movement, stop and correct it immediately.
Do not expect drywall to hide imperfections. Barn doors reveal alignment issues quickly. A careful install upfront saves constant adjustments later.
Frequently Asked Questions
Can I install a barn door track without a header board?
Sometimes, but it depends on stud alignment and door weight. It is not recommended.
What size header board should I use?
Most installs work well with a 1×6 or 2×6, depending on door weight.
Do I need to paint the header board first?
Yes, if you plan to paint it. It is easier before mounting.
Can I use plywood instead of solid wood?
Solid lumber is strongly preferred for strength and durability.
Does a header board reduce noise?
Indirectly, yes. A rigid mount reduces vibration and rattle.
Final Thoughts
Installing a header board is not the flashy part of a barn door project, but it is the most important. It protects your wall, supports the track, and ensures the door operates as intended long term.
If you do this step carefully, everything that follows becomes easier. If you rush it, no amount of premium hardware will save the installation.